5 Tricks to Improve Robustness and Efficiency of SageMaker Pipelines
Simon Stiebellehner is a lecturer in Data Mining & Data Warehousing at University of Applied Sciences Vienna and Lead MLOps Engineer at Transaction Monitoring Netherlands (TMNL). This article is part of the series “The MLOps Engineer” and originally appeared on AWStips.
In this article, you’ll learn…
- … briefly about the concept of SageMaker Pipelines,
- … that transient errors will bug you but #1 Retry Policies are your friend,
- … that #2 resuming stopped Pipelines and retrying failed Steps has quietly been released,
- … when #3 Step caching speeds up Pipelines and when it doesn’t,
- … that #4 structuring your code in a smart way is quite important to avoid drift when developing SageMaker Pipelines,
- … about #5 (ab)using ConditionSteps to execute Sub-DAGs.
Orchestrate your ML workflows with SageMaker Pipelines
If you’ve worked with other workflow orchestrators such as Apache Airflow or AWS Step Functions, the general concept should be fairly familiar to you. While SageMaker Pipelines is also considered a workflow orchestrator, the key difference is that SageMaker Pipelines has a fairly narrow use case — namely orchestrating workflows that aim to perform training or inference using a Machine Learning model.
SageMaker (SM) Pipelines was released end of 2020 at re:invent. Essentially, it’s a workflow orchestrator for SageMaker Jobs. It requires you to create individual SageMaker Jobs (wrapped in executors — so-called Processor or Estimators), embed them in Steps and wire the Steps together to create a DAG, which is represented as a Pipeline object or, equivalently, a Pipeline Definition JSON. This is quite handy as we can easily move this JSON around — for example from account to account. Moreover, via a simple boto3 the command we can create and deploy the SageMaker Pipeline encoded in the JSON.
Below you can see AWS’ classic “Abalone” example showcasing SageMaker Pipelines. The DAG for this ML project is composed of various sequential, parallel, and also conditional steps.

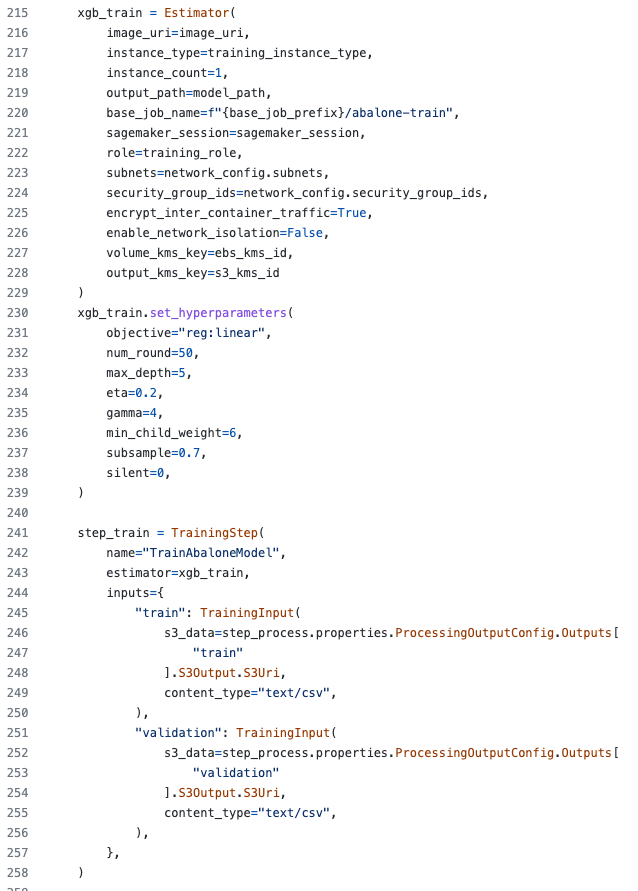
AWS provides the code to a variant of the Abalone example in their MLOps github repo. Using a code snippet of the pipeline.py file, we can zoom in on how a Step is defined a bit more. In the excerpt below, a TrainingStep is created (equivalent to AbaloneTrain above), which holds an Estimator, which again is based on a pre-built Docker image (passed via the image_uri argument) that is tailored to train an XGBoost model. This brief deep dive into the code is important as it prepares us for adding two aspects that’ll greatly improve the efficiency as well as the robustness of our overall Pipeline later.
When all the individual Steps that should compose our DAG/Pipeline have been created, we wire them up by instantiating the Pipeline class and passing the steps to the corresponding argument.

Voila — the DAG is done. We could now start the Pipeline or export the Pipeline Definition JSON, move it, store it and perhaps deploy it somewhere.
We’ve now fast-forwarded quite a bit. That’s fine as there’re a lot of good introductions and tutorials to get familiar with the tool SageMaker Pipelines by itself. For example, this article, this coursera course, or AWS’ original tutorial.
In this post, we’re focusing on 2 important and fairly easy tricks on how you can make your SageMaker Pipelines more efficient and robust.
Transient errors & inefficient full Pipeline runs
When you work with SageMaker Pipelines, there’re 2 very annoying things you are definitely going to encounter:
- Transient errors 🤔
- Re-running an entire pipeline ⌛ although you wouldn’t really have to
Transient errors
Transient errors, i.e. errors that will resolve themselves, sound like a good thing at first. Who doesn’t like a self-healing service! Even if it doesn’t happen often, once you start seeing transient errors pop up randomly at various stages of your SageMaker Pipeline, you will get annoyed though. Not only that, but it might also cost you quite some money for re-running expensive jobs. Known transient errors when using SageMaker Pipelines are, for example:
- You’re hitting resource limits because there’re already other jobs running that consume all your quota for the instance type you’ve chosen in your Pipeline Step, causing your Step to fail.
- There’re some hick-ups in the communication of your nodes on the Spark cluster you spun up by using a PySparkProcessor as a Step in your Pipeline, resulting in a Step failure.
- AWS throttles the usage of a downstream service that you’re using from a Pipeline Step, causing your Step to fail.
When a single Step in your Pipeline fails, your entire Pipeline fails. Now imagine such a transient error hits a Step that’s in the middle or towards the end of a Pipeline that has been doing some heavy lifting, running overnight or even several days, processing data and training models. That’s fairly frustrating. And it’s not even your fault that it failed. However, it is your fault that you weren’t prepared for it.
Inefficient full pipeline re-runs
In contrast to e.g. Airflow, SageMaker Pipelines does not allow you to launch an individual job of a Pipeline or a subset of a Pipeline/DAG out of the box. That can be quite inefficient, for instance, if you change the logic of just the last Step of a larger DAG. You’re then forced to re-run the entire Pipeline to actually see that change working in the context of the Pipeline.
Let’s learn some tricks that’ll make our lives better!
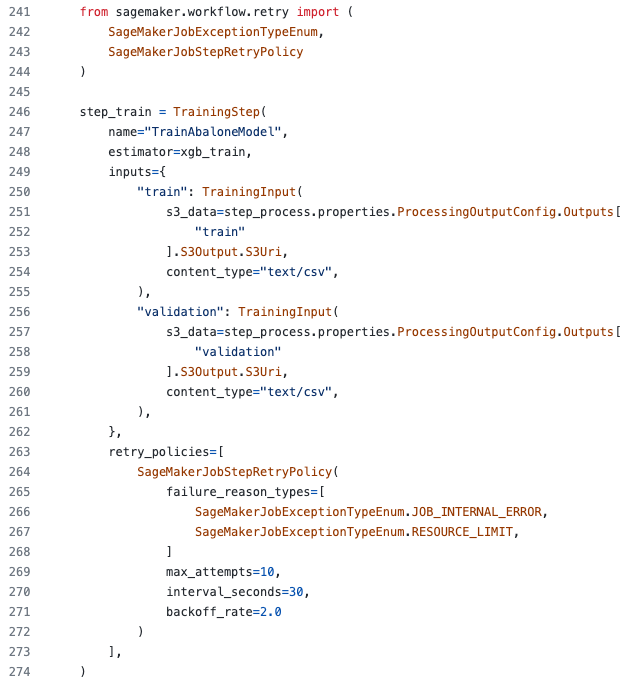
Trick #1: Prepare for transient errors with Retry Policies
If you’ve read this article until here, you’re well aware that there’re some transient errors when using SageMaker Pipelines that could make your life harder. The good news is, that since the end of 2021, you can build robustness into your Pipeline Steps quite easily using Retry Policies. Most SageMaker Pipeline Steps support passing Retry Policies directly when creating the Step. It allows for a relatively fine-grained setting of retry behavior for different types of exceptions. Using the code example from above, below we’ve added a simple Retry Policy to the TrainingStep using the retry_policies the argument that captures failures induced by quota limits and internal job errors.
Trick #2: Resume/retry failed or stopped Steps to avoid full Pipeline runs
Since end of 2021, SageMaker Pipelines (finally) supports resuming stopped Pipelines or retrying a failed Step in a Pipeline. This feature quite silently slipped into a large chunk of releases last November/December. Note the failed Step PreprocessData and the orange Retry button on the top right when looking at a SageMaker Pipeline execution via SageMaker Studio. For user-stopped jobs, this button would show Resume.

Of course, you can also trigger this behavior via theboto3 call retry_pipeline_execution as documented here.
Trick #3: Cache your Step results to speed up Pipeline runs
You can cache results of Pipeline Steps to speed up your DAG runs. That’s great if you only changed the logic of one job, but want to run the full Pipeline. It’ll just use the cached results and you’ll fast-forward to the Step that actually changed. Also, it’s quite easy to implement as it just requires passing a cache_config to the corresponding Step:
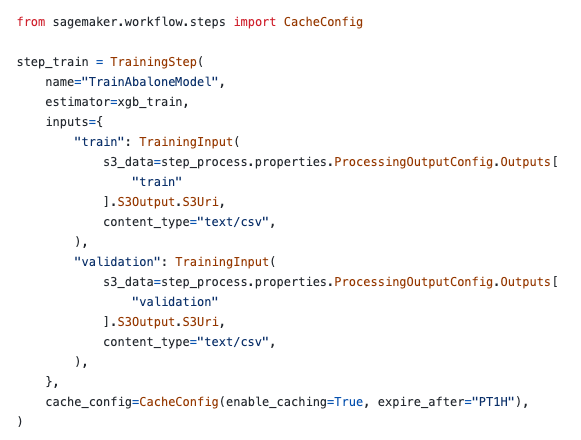
Note that caching of Steps results only works if the arguments of the Steps remain the same. This means that if you pass a unique Execution ID or a dynamic timestamp to a Step, caching will not work.
Trick #4: Structure your code to allow for single-step and Pipeline execution w/o code duplication
There’re 4 phases that developers typically go through when developing a SageMaker Pipeline:
- Write the job logic, e.g. in a simplepreprocess.py .
- Create a SageMaker Studio Notebook that uses that preprocess.py in a SageMaker Processor. For example in aScriptProcessor or a PySparkProcessor .
- Launch the Job via the notebook using the .run method of the Processor object.
- If (3) works, c/p the code that creates the Processor from the Notebook into the pipeline.py file, wraps it into a Pipeline Step, and wires it into the SageMaker Pipeline DAG.
This sequence of phases feels like a logical one: Start by developing an isolated step, run it, and once it works wire it into the Pipeline. However, there’s a considerable problem with this, which will inevitably come back to bite you at some point. The .run method, which you’d use to run a single isolated job using a SageMaker Processor has a somewhat different API than what you’d be using when using a Processor a Step to make it part of a SageMaker Pipeline. This means that it’s not only copy-pasting, but it also requires adaptations, which will inevitably lead to drift between what that specific job does in a Processor standalone vs. what it does as part of a Pipeline.
Therefore, make sure to structure your code in a way that allows you to use exactly the same logic for running individual jobs/Steps and the full Pipeline. It helps to write wrappers that take care of the different APIs, making the exact same logic easily usable individually as well as in a DAG.
Trick #5: Use ConditionStep to shortcut into a Sub-DAG
What if you just want to run a part of your Pipeline and step caching doesn’t work for the reasons mentioned above? Say, you’re frequently changing the postprocessing logic and you just want to run that and the subsequent jobs over some previous model inference results.
You can use a ConditionStep combined with a Pipeline parameter evaluated at runtime to achieve this. How?
- Add a ConditionStep at the very beginning of your DAG to enable immediate branching off to the Sub-DAG that you want to be able to run in an isolated way.
- Add a ParameterInteger (could also be another type of parameter) called (e.g.)only_postprocess that defaults to 0. You can now pass this parameter with a value to the .start method of the Pipeline when you kick off the Pipeline.
- Configure the ConditionStep such that it evaluates the only_postprocess parameter when the step is triggered. If the parameter is 0 (default), follow the normal flow, if it’s any other value, execute only the postprocessing Sub-DAG.
Beware of side effects!
Are you interested in curated, high-quality content around MLOps?
Follow Simon on LinkedIn to stay up-to-date.